
The Charting window helps you record details about a patient’s dental health and other relevant information. This includes:
- Displaying existing conditions and treatments on the teeth on the Odontogram
- Managing treatments
- Documenting and viewing clinical notes
- Tracking conditions
- Monitoring continuing care
- Viewing patient images
Employee Permissions to Access Charting and Treatment Planning
The Dental Chart window consists of charting and treatment planning. To get access to the Dental Chart window, including charting and treatment planning, you must be granted either the
View Treatment Planning or View Charting employee permission. When you select one permission, the
other permission is automatically selected, too.
You cannot have only ‘Charting’ or only ‘Treatment Planning’ access.
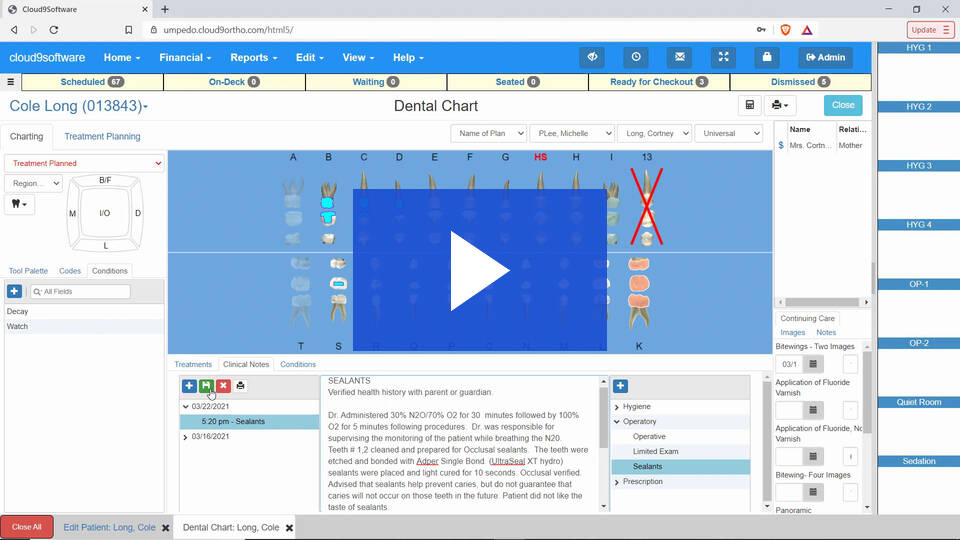
Charting Window
|
Number |
Button name |
How to Use |
| 1 | Status |
Select the treatment status; common options are
Treatment Planned, , and Referred Out.
Note: These are customizable for color, terminology, and order under
Edit > Setup > Treatment Status.
|
| 2 | Region | This is the region of the mouth that the treatment is needed. This will mainly be used for spacers and retainers. |
| 3 | Set Tooth | Update how the patient’s teeth display on the Odontogram. This can be used to toggle between primary/permanent teeth as well as missing and supernumerary |
| 4 | Add Progress Notes | To use this you will click on the tooth you are wanting to make notes on then click the button and you can free form type your note. |
| 5 | Tool Palette | This is your “quick buttons.” These are set up in the edit>setup>tool Palette. |
| 6 | Codes | You can search for treatment by codes if that is easier for you. |
| 7 | Conditions | This is where you will chart conditions that teeth have. These are set up in the Edit>setup> Condition types. |
| 8 | Surface Picker |
Select the surface being serviced.
Note:
Mesial and distal
surfaces are not displayed on the Odontogram for all displays of
the tooth.
|
| 9 | Treatments | This is a list of all treatment: Planned, Completed, and Existing. Planned treatment is in RED, Completed treatment is in BLUE, and Existing treatment is in GREEN. |
| 10 | Clinical Notes |
The Clinical Note section has three sections: Time Tracking; Note Section; and Templates and Questionnaires options. You can only edit or delete a clinical note within 24 hours after it was created.
|
| 11 | Conditions | Conditions are charting types that are carried throughout all treatment plans. Examples are cavities, cracked tooth, etc. |
| 12 | Progress Notes | This is the list of all notes you have made for certain teeth. |
| 13 | Treatment Plan |
Cloud 9 automatically creates a default plan. You can begin
treatment planning by using this default plan and continuously
growing the plan. You may also create additional plans (e.g.,
per doctor or per visit) from the Treatment Planning tab, if you
choose. You can rename plans on the Treatment Planning tab.
|
| 14 | Provider |
The default provider is the provider entered in Edit Patient
window. Before beginning the treatment plan, Cloud 9
recommends changing the provider to the pediatric dentist.
Once you make this change, the pediatric dentist will remain as
the provider on the chart until you change it again.
|
| 15 | Responsible Party |
The default responsible party is the first one assigned. You can
change the responsible party for the treatment plan, but you
usually do not need to.
|
| 16 | Numbering System |
Select the corresponding numbering system: Universal, Palmer
or International
|
| 17 | Recalculate Fees |
If you update or change the patients benefits or insurance
max, click this button to recalculate.
|
| 18 | Print Patient Route Sheet |
Click this button to print the Patient Route Sheet from the
Report Viewer.
|
| 19 | Patient Relationships | Financially Responsible ($), Patient Only ( |
| 20 | Image | Facial Frontal Smiling image from patient images |
| 21 | Continuing Care |
Cloud 9 provides you the ability to manage continuing care
treatments – preventative and maintenance treatments –
performed periodically by dentists. Examples of continuing care
include bitewings, prophylaxis, an exam, fluoride and x-rays.
|
| 22 | Images |
This tab shows an image series along the side of the chart. You can double click an image to open the Images window. From the Images
window, you can import, view, edit and export a patient’s images. Images are stored in a series using standard or custom layouts.
|
| 23 | Notes | This tab provides quick access to the clinical notes. |
Overlays
Overlays display on the Odontogram and provide a quick visual of the treatment for each tooth. You
can customize overlays using patterns and colors via Edit > Setup > Transaction Types and Edit >
Setup > Treatment Status.
You can assign the following fill patterns:
When you delete a planned extraction or invalidate a completed extraction, Cloud 9 removes the X
overlay and restores the tooth to its state prior to the extraction.
Dental Chart - Pediatric
Dental Chart 2 - Pediatric
